Cardknox Merchant Portal October 2020 Release Notes
Our release of the Cardknox Portal covers a lot of ground. As usual, our main intent is to help you get your work done faster and easier.
Transactions, as well as Customers & Recurring Schedules, received a good deal of our attention. We’ve extended the search capability for batches, added a new sales tax setting, and improved the flexibility for applying sales taxes and convenience fees. Another big change is the addition of two roles you can assign to your Cardknox users, the Auth Only role and the Sales Only role.
To help new merchants and their employees learn about Cardknox, we’ve created a 20-minute video tutorial. You can access the video under Help on the left menu tab. We hope you enjoy the video!
All of these changes are available to you now from the Beta Portal. For more information or to learn how to access the Beta Portal, see this section of the Cardknox Merchant Portal User Guide.
Improved Search Functionality for Batches
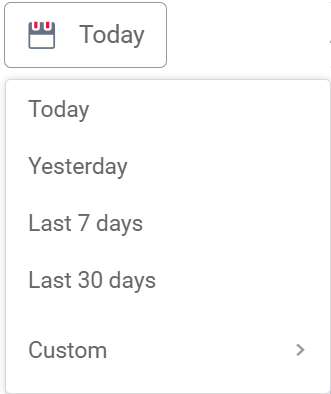
Cardknox has improved the search functionality for batches. You can now search back through a 30-day period. To try it out, go to Batches, which opens in the Closed Batches view. Click the button with the calendar icon in the upper left corner (see below) and select Last 30 Days.

New User Roles and New Dedicated Transaction Screen
We have added two user roles to give merchants more flexibility in granting system access to employees. Auth Only users can perform only authorizations, while Sales Only users can perform only sales transactions. Sales Only users can also access and use the Send Payment Request screen. To set either of these roles for a new or existing user, go to Settings > Users.
Additionally, Cardknox has created a dedicated screen for these users to perform authorizations and sales transactions. Auth Only and Sales Only users who click on New Transaction on the left menu area will see a simplified Transaction screen. Auth Only and Sales Only users can process authorizations and sales, but you have peace of mind that your business and client data remains private.
Sales Tax and Convenience Fee Settings
Set Up Sales Tax Ahead of Time
Instead of entering the sales tax at the time of a transaction, you can now set it up ahead of time, similar to the convenience fee setup. To access the new sales tax setup, go to Settings > Transactions > Set up Sales Tax. For more details, see the “Transaction Settings“ section of the Cardknox Portal User Guide.
Add Convenience Fees Before or After Tax Is Applied
Merchants let us know that they needed to add convenience fees after applying sales tax, so we’ve added that functionality. By default, Cardknox now applies the sales tax to the original amount, and the convenience fee is on top of that. If you need to change this behavior so that Cardknox first adds the convenience fee and then the sales tax, go to Settings > Transactions > Set up Convenience Fee and select the Apply Convenience Fee Before Sales Tax checkbox.
Reports
Merchants now have easy access to an end-of-year report instead of having to create a custom report. This report is available on the Reports screen on the bottom right under “Other Reports.” Like other Cardknox reports, you have the option to either view the report or export the report.
Other changes to reports, this time for transactions:
- On downloaded transaction reports, merchants can now see if a transaction has been voided. To turn on this feature, go to Settings > Reports > Transaction and select the Exported Transactions Report Should Display Void Status checkbox. This action adds the Void Status column next to the Amount column on the downloaded CSV report.
- The Bill Phone column is now available on transaction reports. To see this column, go to Reports and select the gear icon in the upper right corner. On the dropdown, select the Bill Phone checkbox and click Done.
Customers and Recurring Schedules
Two New Settings for Recurring Schedules
If you want to ensure that customers automatically receive an emailed receipt after a transaction, we have a new setting for that. To turn this setting on, go to Settings > Recurring. Select the Send The Customer A Recurring Schedule Receipt By Default checkbox. This action ensures the Send Receipt checkbox is always selected, so you’ll never have to remember to set it again!
For new recurring schedules, Cardknox can now run monthly recurring transactions on the same weekday as the first transaction. For example, if the first recurring payment occurs on the second Tuesday in November, all future transactions after that would also run on the second Tuesday of the month. To enable this option, go to Recurring Schedules and select the New Customer button. On the Recurring Schedules tab, choose Monthly from the dropdown and select the Run Recurring Schedules at a Specific Day of the Week checkbox.
Other Customer and Recurring Schedule Enhancements
Cardknox wants to ensure that merchants always have the right information where they need it. Here are a handful of improvements we’ve made to Customers and Recurring Schedules:
- You can now see customer notes on the Customers tab without having to open the customer details. To see the Notes column, select the gear icon in the upper right corner, select the Notes checkbox from the dropdown, and click Done.
- If you forget to define a schedule name when you create a recurring schedule, Cardknox does it for you by auto-populating the Schedule Name field with the schedule ID.
- When you preview a schedule, the schedule name now appears at the top of the schedule preview pop-up. To see this in action, go to Recurring Schedules and select a schedule. In the detail area, select the menu button (three-dot button in the right corner). Click on Preview Schedule.
- On the Recurring Schedules tab, you can now see the invoice ID for a recurring schedule. To see the Invoice column, select the gear icon in the upper right corner, select the Invoice checkbox from the dropdown, and click Done.
- To make it simple to identify the payment method card type for a recurring schedule, Cardknox now displays a small icon to the left of the masked card number, identifying it as Visa, Mastercard, American Express, etc.
Unique Links for Customers and Recurring Schedules
Each customer and recurring schedule now has a unique web address. When a customer or recurring schedule is displayed, copy the web address at the top of the browser tab. You can then paste it into other applications for easy access. You also have the option to bookmark the web address for future reference.
Transactions
One Click to Email Payment Request Links
Sending a Send Payment Request link to a payee is now even simpler. First, enter the appropriate information on the Send Payment Request screen. Then click the Email button. Type the payee’s email address on the pop-up and click the Send Email button. That’s it! Your payment request email is sent through the Cardknox system.
Process Transactions Faster for New Transactions Pop-up
When you’re working, sometimes every second counts. Cardknox has tweaked the transaction processing on the new transaction pop-up. Previously, to finalize the transaction, you clicked the Process Transaction button. However, you can now press the Enter key on the keyboard to save the transaction and quickly move to the next.
Enhanced Transactions View
- For transactions that result in an error, you can now see the reason for the error on the Transactions tab. Select the gear icon in the upper right corner, select the Error Details checkbox from the dropdown, and click Done.
- Cardknox added a hover bar that’s displayed when you pause your mouse cursor over a transaction. The hover bar gives you faster access to the New Transaction, New Customer, and Adjust actions.
- Cardknox has changed where transaction details are displayed. Instead of appearing beneath the transaction row, Cardknox shows it on the right side of the screen. The most commonly used actions (New Transaction, New Customer, Void, Refund, Adjust) appear as icons at the bottom of this right-side display:
Building PaymentSITE Forms
In August, we released the new PaymentSITE Management module for building a PaymentSITE request form. Thanks to great feedback from our merchants, we’ve continued to make improvements to this feature. One change we’re sure you’ll appreciate is that we’ve added the Undo action on the form-building screen. The new Undo button is located in the upper right corner, next to the Publish button. You can also press Ctrl+Z on your keyboard.
Note: The PaymentSITE Management module is available for Admins and Advanced Users only. For detailed information on the PaymentSITE Management module, see the Cardknox Merchant Portal User Guide.
Tip! The PaymentSITE Management module is currently in Beta, so you can try it out before it’s available to all users.
For more information or to learn how to access the Beta Portal, see this section of the Cardknox Merchant Portal User Guide.
For more information or to learn how to access the Beta Portal, see this section of the Cardknox Merchant Portal User Guide.
Stay Logged In for Longer Periods of Time
Previously, Cardknox users were automatically logged out of the system after 30 minutes. However, we’ve changed this behavior so that as long as you remain active in the system, you will not be automatically logged out.
Cardknox Wants to Know How We’re Doing
We’re committed to learning as much as possible about our merchants’ experiences with the Cardknox software. To make it easy for you to provide feedback that reaches us immediately, we’ve added a rating bar at the bottom of the Merchant Portal Dashboard screen.
How about trying out the feedback form right now? We’d love it if you would rate your experience with Cardknox and let us know what you think!


