Cardknox Portal November 2019 Release Notes
Cardknox Merchant Portal November 2019 Release Notes
You’ve got a lot on your plate—which is precisely why we aim to save you time and hassle when it comes to managing your payments! In Version 6.0 of the Cardknox Portal, we’ve made several improvements to help you make the most of your Portal experience in a lot less time. You’ll now be able to create recurring schedules even faster with recurring templates and automated pre-filled fields; seamlessly locate transaction data with our new filters and functionalities; personalize the display of your payment data; and customize how payments are processed (set up a convenience fee or enable duplicate transaction processing!) Keep reading to learn more about these enhancements and many more!
Set Up Recurring Schedules Even Faster & Automate Your Billing Cycle
- Create Recurring Schedule Templates That You Can Apply to Customers
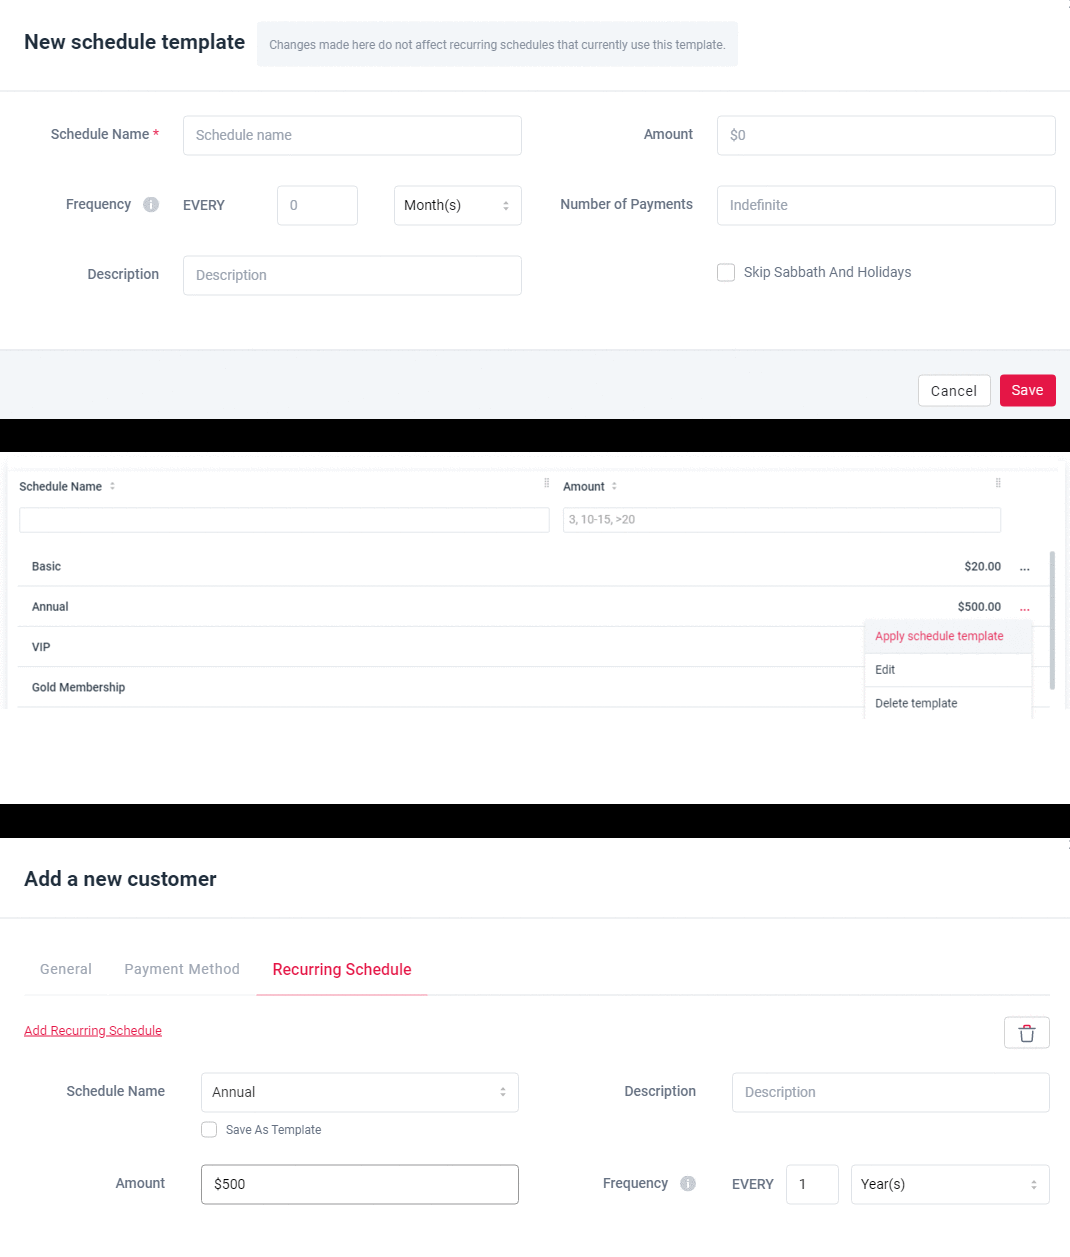
Do you offer subscription and membership tiers or other frequently-used recurring billing options? Now you can save time on manual entry of such schedules with our Recurring Schedules Templates!
In the Recurring Schedules module, simply navigate to the “Templates” tab to create a customized recurring schedule with our standard recurring schedule fields (e.g. schedule name, amount, frequency). You can then apply this schedule to a new customer payment plan with the click of a button: select “apply schedule template” next to the desired schedule, and it will pull up the “Add a new customer schedule” pop-up with the recurring fields pre-filled!

- Generate a Payment Request Form With Pre-Filled Customer Info
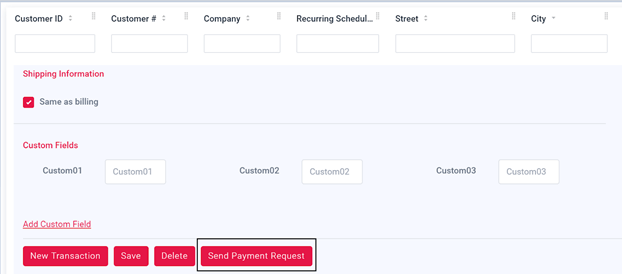
Make it easy for customers to pay without adding to your workload. With the new “Send Payment Request” button, you can quickly generate a Payment Request Form that’s been pre-filled with the customer’s billing info! This button is located underneath each customer’s listing in the Customers module.

- Add a New Recurring Schedule Within Seconds
We’ve condensed the “Add New Customer” pop up to include only those fields that are required for a recurring schedule. This means that you can now select the “Add New Customer” button to create a recurring schedule!
To view all of the “Add New Customer” fields in the window, click “Advanced View” at the bottom of the pop-up. Once expanded, any info you’ve already entered will display.
- Add Prefilled Recurring Schedule Fields to the Payment Request Form
Wouldn’t it be so much easier if your repeat customers were enrolled in a recurring payment schedule so you wouldn’t have to chase after them over and over again? With the new recurring schedule fields in the Send Payment Request module, you’ll be able to pre-fill the desired payment frequency and the number of payments to display in the Payment Request Form. Your customers will then be able to opt in to recurring payments when making a payment!

View and Manage Data With Ease in the Transactions Module
- Filter by Card Type
Looking for a specific Amex transaction? You are now able to filter results in the “Transactions” tab by card type (e.g. Visa, Discover, Amex, etc.). To do so, enter the desired card type into the “Card Type” column, or, you can select the card type(s) in the “Filter” dropdown menu at the top of the Transactions page.
- Filter by Payment Method
You can now search for credit or debit transactions by adding the ‘“Payment Method” column to the Transactions module! To add this column, simply click the settings icon in the top right corner and select the checkbox next to “Payment Method.” Or, you can navigate to “User Settings” in the Settings module and select the checkbox next to “Payment Method.”
Once you’ve enabled this column, the payment method will be listed on transaction receipts, too!

- Locate a Specific Transaction With a Custom URL
When applying filters to find a transaction, the URL now updates automatically. This feature will allow you to keep the URL on file so you can paste it in your browser to access a specific transaction at a later date.
- Download Transaction Reports for QuickBooks
Reconcile your accounts with ease by downloading your Transactions report in the QuickBooks format! Upon selecting the download icon, you’ll be able to choose between CSV or QuickBooks formats.
Customize Your User Experience in the Settings Module
- Change the Default Date Range for the Dashboard
In “Display Settings,” Click the dropdown menu next to “Default Dashboard Data Range” and choose from different options (such as today, yesterday, past 7 days, etc.) to change which data is displayed on the Dashboard.
- Choose Which Module You’ll See First When Logging In
Do you prefer to see the Quick Reports module rather than the Dashboard when logging in? Click the dropdown menu next to “First Screen After Login” in the “Display Settings” tab to choose which module you’d like to see first.
- Set Up Convenience Fees to Offset Processing Costs
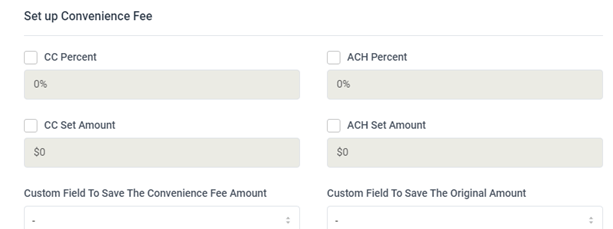
We’re excited to share that users are now able to set up convenience fees in the “Transaction Fields” tab of the Settings module! You can set up convenience fees for credit cards and/or ACH transactions, and you’ll be able to choose between a dollar amount or a percent for the fee. Plus, you can select where you’d like these fields to display in the “Add new transaction” popup (under the “Custom fields” section).
Once you’ve added a convenience fee, it will be automatically computed and displayed when processing a new transaction.
Note that laws and regulations may apply to the charging of convenience fees.

- Field Labels Are Optimized Upon Selecting a Canadian Time Zones
Once you’ve selected a Canadian time zone in the “Display Settings” tab of the Settings module, all fields labeled “state” and “ZIP” will update to “province” and “postcode,” respectively.
- Enable Duplicate Transaction Processing
Processing of duplicate transactions is disabled by default to prevent fraud. However, now users can allow duplicate transaction processing by selecting the checkbox next to “Allow Customer to Process Duplicate Transactions” in the “Transaction Fields” tab of the Settings module!
Even More Enhancements
- Get Instantly Notified of Any Gateway Issues
We’ve added a popup that will display in the unlikely event of an outage.
- “Add New Transaction” Pop Up Now Expands All Required Fields by Default
We’ve kept our “Add New Transaction” window compact while also making sure to display the required fields for your convenience.
- Improved User Interface
We implemented a general design upgrade that greatly improves the display of data.
- Stay Up to Date on the Latest Cardknox Features
We’ve added a notifications icon (bell) that alerts you about important Cardknox features and the release notes.
- Make the Most of Your Portal Experience With the New Help Module
We strive to make the Cardknox Portal as user-friendly and intuitive as possible, but we realize that questions are bound to come up along the way. That’s why we’re excited to share that we’ve added a new Help module that has quick links to important resources. Click the Help tab in the navigation bar to display a drop-down menu with the following links:
- Contact Us
- FAQ
- User Guide
- Remote Support
Coming Soon: Our User Management module is in the works! You’ll soon be able to personalize your Portal further. Stay tuned!


